Tuesday 25 June 2013

'Collage Self-portraits' (Museum Style) An easy-peasy arty activity for ALL age & abilities..

'Self Portraits in Collage Museum Style'


We had a ball at our after school class this evening.  Our session was based around representing ourselves on paper and what moods we wanted to show ourselves in.

Following a bubbly chat about why we make self-portraits and what's good about them (they are cool, you can hang them on the wall, they look pretty, people want to make themselves look great, they are great gifts, etc, etc) we set to work on ourselves!

The children worked really hard over this session which lasted 1hr & 15mins.  Full to the brim of activity and really quite movement based, we worked hard from start to finish.  I made some really simple 'frames' on some brown paper and whited out the centre to give the children a 'space to fill'
this worked really well and encouraged the children to work bigger than they might naturally.

There are some superb pictures here, well done indeed and am really really looking forward to repeating this exercise with my second school of the week.

Well done everyone!  Hints & tips on how easy it is to do this exercise at home underneath the photo's 

Much love, Sam x 


How to do this at home:

This is an utterly fantastic activity to do en famille on a rainy afternoon.   

You will need:

  • Magazines, newspapers, coloured papers, etc.
  • Glue.  (a glue-stick is fab)
  • Large sheet of paper for the frame.  
  • Scissors.


Hints & Tips:

  • Don't be tempted to work to small!!  Give yourself/your child a big frame space to work in.  This promotes creativity.
  • I used some brown packing paper as I have a massive roll for sending out, which I taped around the edges on the back to make it more durable - we definately don't want any rips!


Sunday 28 April 2013

We had a ball at yesterday's 'Acrylic Painting for All' art workshop. Our best one yet!


Having worked muchly with children recently I was a little nervous at teaching adults again!  I needn't have worried  at all as not only did everyone that came happen to be absolutely lovely, they were also ready, willing and gung-ho to get going with the wonderful paints that are acrylics.
We set up the hall on Friday night as is normally the case.  However on this particular eve the light that flooded into the hall was just divine, so much so that I stayed on for an extra hour or two to finish a large scale floral work that I've been struggling with recently.  I loved it and the painting was completed.
We tried things a little differently this time with the food for our day.  Our wonderful family friend Andy is an outstanding cook and he very kindly produced lunch for us.  Cor, the menu was fantastic.  All home-cooked we enjoyed a Salmon Quiche served with dauphinoise potatoes & a watercress salad (along with warmed french bread) I can't tell you how delicious it was!  Following that we had cheeses, chutneys and oatcakes.  At high tea we enjoyed a home-made lemon cake which disappeared very very fast along with lashing of tea.  We truly felt utterly treated which was exactly our mission!
Below are some photo's of our day to enjoy.  If you would like to be kept in the know with our new workshops as they are announced, please email me on samantha@artypops.com
Much love, Sam x 
'Acrylic Painting for All' Art Workshop with Samantha Barnes 309968_10151472908164221_2144569077_n-1 387294_10151472906869221_856494594_n-1 387294_10151472906869221_856494594_n 395665_10151472906939221_2046842488_n-1 395665_10151472906939221_2046842488_n 395752_10151472908099221_1758502512_n-1 395752_10151472908099221_1758502512_n 397869_10151472906679221_149289536_n-1 397869_10151472906679221_149289536_n 399645_10151472906229221_381196898_n-1 399645_10151472906229221_381196898_n 401339_10151472907834221_814143986_n-1 401339_10151472907834221_814143986_n 401882_10151472907579221_1873943648_n-1 401882_10151472907579221_1873943648_n 407068_10151472906374221_1620060093_n 417897_10151472907539221_42801158_n-1 417897_10151472907539221_42801158_n 420629_10151472906759221_1544527943_n 484557_10151472907139221_158566946_n 485617_10151472907879221_1749157348_n-1 524690_10151472908299221_1700869008_n 550308_10151472906139221_955904467_n 550308_10151472907174221_35099007_n 922706_10151472907324221_2060658745_n 922732_10151472906714221_1264788937_n 923002_10151472907104221_1101297787_n 935423_10151472906324221_932355868_n-1 935480_10151472906964221_1287857611_n 936988_10151472908349221_174595246_n-1 936988_10151472908349221_174595246_n

Saturday 13 April 2013

Our 'Artypops Easter Holiday Art Workshop' was a rip-roaring success....


IMG_4349 Artypops children's art workshop IMG_4370 IMG_4327 IMG_4323 Artypops Childrens Art Classes

Tuesday 9th April saw us in a fab new venue here in our village of Overton, Berrydown Sports Pavillion.  We had a superb day of making, doing, dancing, running and playing.
The activities we settled on were:
1.Painting Monsters & Animals onto beautiful pieces of driftwood.
2.
Beading necklaces.
3.
Making our own people key rings .
4.
Crafting Clay Birds avec feathers!
5.
Drop & Draw! Huge sheets of paper to draw around ourselves...if we have time.
Our day was packed full of creativity.  'Drop & Draw' was fantastic fun, an example of which was upon the call, we instantly dropped and awaited instructions - one of which was to draw the face of the person nearest to you - brilliant fun!
All the babes had a fab day and thank you to all the parents for your lovely letters and comments expressing so.  More workshops coming soon.
Samantha


Saturday 30 March 2013

Easter craftables for the babes in a flash!

Easter?  Really?

Now far be it from me to be Mrs Minus, I love the celebration of Easter as each year I find it's so needed after the long hard winter...daffs, colour, flowers, smells (and occasional sights!) of the sun....freshly cut grass and the Springish pastel colours that pop up everywhere.  Gorgeous.

No, my problem is  that my head is still in January somewhere.  With that in mind, my Mum and I went shopping on Wednesday to do try and get prepared for family staying and perhaps more importantly, the children at home for TWO WEEKS?!  huh?!

All it took was a good food shop, bit of planning with Mum over coffee & muffins and hey presto I'm home with a clean car, boot full of nosh and 24hrs to kick the house into some sort of order for the holidays.


Day 2 now of the Easter break and we are on our way to having a brill Easter with the mega thrill of seeing lots of lovely pals and family that we never get to see enough.

Easter activities in a flash?  There are plenty.  So far mine have been too wrapped up in everything other than needing to be occupied - if it ain't broke and all that!

This morning though, I boiled up some eggs..am ashamed to say with the egg still in...yeah right, egg-blowing etc, etc...sounds great but my babes would break the delicate shell in a second...with that in mind I thought that being smelly would be better than heartbroken so...

Boil and cool.  When cold, gather a smidge of glue, anything that you can add that you have around...sparkles, gems etc.  A couple of marker pens here are a must...and of course some googley eyes...bonza....happy babes with smelly eggs.

Position, photograph and enjoy for 24hrs then slide into the bin without the children noticing...everyone's a winner!

Happy Easter everyone x


Sunday 24 March 2013

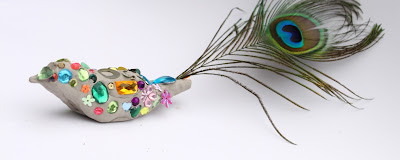
'Crafting BEAUTIFUL BIRDS' from Clay, with lashings of jewels & sequins and lovingly finished off with smothers of PVA...VERY excited about this one!

This activity proved to be an absolute winner!  

The children LOVE working with clay.  I have just had my third lot delivered - have gone from 2kg, to 5kg to now 12.5kg as its so in demand!

This activity is called 'Crafting BEAUTIFUL BIRDS'.

You will need:

Airdrying clay
Beads/sequins/Sparklies
Feathers
Googly eyes.
PVA Glue


1.
Take a palmful of clay and begin to mould into a bird shape.  It doesn't have to be brilliant but we googled some bird shapes and worked from those.

2.
Applique is the way here.  Enjoy every moment of applying all your sparkles.  Glitter might work really well here too.


 3.
Once your bird is looking lovely it's off to the airing cupboard with it.    24hrs in the warmth is all thats needed.  If you don't have a warm space pop it on the radiator and leave well alone for a day or two.
4.
When your bird is dry, you need to cake it with PVA glue.   The glue dries clear so don't worry about layering it on.  Once again, leave to dry overnight.
5.
When your bird is dry, she is ready to enjoy.

Much love, Sam x


'Artypops Easter Art Workshop for Children'. April 9th. 4 Spaces left!


Sunday 10 March 2013

Let's make...'Dreamy Dream Catchers' Perfect for a rainy afternoon in with the babes..

'DREAMY DREAM CATCHERS'

Perfecto for rainy afternoons indoors, another gem from the wonderful Marion Sweet...now retired childminder after some 20 years and all round general superstar in all things make & do-ey!  I adore her. 

Righto:

Gather all the materials that you can muster, Marion have tried to use all things that we might have around the house.

You will need:

A paper plate with the centre cut out
Colour felt tips
Tissue papers and shapes
2 circles of sticky back plastic which is slightly bigger than the cut out shape in the paper plate
Thread
Beads, etc
Blu tack
Pencil


1.
Decorate the back of the plate


2.
Place one of the sticky back plastics on the circle cut out.

3.
Put the shapes and tissues onto the sticky back and then place the other circle of sticky back in place.


& turn it over...et voila!  Looking gorgeous.


4. 
Take some blu tack and place at the BOTTOM of your plate.  With the blu tack in place, take a pencil and make 3 holes through the blu tac and the plate (this adds weight).

5.
Take your thread and place 3 lengths into the holes and make them secure.  Hang anything you wish onto the threads, beads, feathers, etc.

6.
Repeat again to make a hole at the top of the plate so you can hang your dream catcher and tada...we are there with a BEAUTIFUL Makey-doey!  Well done you!

Much love

Samantha Barnes, but much more Marion Sweet..(well done again Marion!)


Friday 22 February 2013

Yesterdays' February half-term children's art workshop...what a ball!

It's Movietime!!  
(Scroll down after the movie)


Isn't that just the nuts?  We had the most wonderful day yesterday.  30 children, lots of doing, making, drawing, colouring, dancing, story-telling and cake eating!!

Thanks to everyone for making it such a brilliant day.  Creativity in everyday life is SO important.  We can suppress it for years and years then rediscover it when the time is right.  Our confidence is low and it grows when we begin to practise it again.  

When we are children, our natural state is to launch in and get messy.  As we grow we somehow lose the abandon to explore life through art - this is a huge shame.  The good news is though that it comes tumbling back whenever we want it to, we just need the keys...and the keys are....(are you ready?) the keys are.... allowing ourselves to do it.  accepting that it might take us a while to get 'good' (whatever we deem to be good) and simply allow ourselves to actually do it, to pick up a brush, a pencil and just 'do'.  

It's peasey...I promise!  Come on one of my workshops...that's my favourite bit... working with someone that hasn't done any art for a gazillion years...let me hold your hand...literally!  

Much love

Sam x

Thursday 31 January 2013

Utterly lovely hearty-bunting... a make-along with me (er Marion!)

Its deep dark January now.  

As we speak my two babes are screaming in joy at being allowed to play a round of 'Jump on the Sofa as hard as you can' in the sitting room...  deep joy (don't get involved, don't get involved, don't get involved Mum!)

Now then, I don't know about you but I believe it's really important to give children the space (occasionally) to get bored.  Poor old ds has been home ALL week with a weird viruses-temperaturey thing that sweeping through our village...9 children off in his class since Tuesday.  Not to have a ripe old moan or anything but coupled with being snowed in ALL of last week and the week before that it being half-term - let them have bored...I'm all out of ideas!

Queue Marion, my gorgeous childminder and fellow artist, she is a plethora of all things creative and saved the day.  I had some plastic and she did the rest.  Here's what she did:

Hearty Bunting with Ribbons

List of items you need:

Sticky back plastic, a sheet of.  (Book covering is good)
A heart shape to cut around, hand-sized is good.
Tissue paper shapes
Scissors
A hole- puncher
Ribbons

1.
Cut the sticky back plastic to the same height of the heart shape.


Place the shiney side of the plastic on to the table then peel the backing off.  Place the colours tissues shapes on to the sticky back (not too close together, lots of spaces)


Fold your plastic over on itself, securing the tissues and sticking the plastic back onto itself.  Place your cut-out heart shape underneath and cut around it.   


Then cut each heart shape out leaving you with this..

At the top of the heart place the hole-puncher and push down to make the holes that the ribbon will go through...your'e doing great!


After you made all the hearts (do about 6) trread the ribbon through the holes and create the banner. 


Beautiful!  Well done everyone, Marion especially for saving the day!  Beautiful bunting.  Hope you like the cloudy shed too!  Much love, Sam x